Action Pages -> Form
Access the Form tab within the Builder to customize the data you would like to retrieve from supporters.
The following data fields are available:
- Email (required by default)
- Phone
- Name (and Organizations) (required by default)
- Address (required by default)
- Employment
- Birthday
- Date
- Selection List
- Hidden
- Question
- Text
- Requirement
Phone
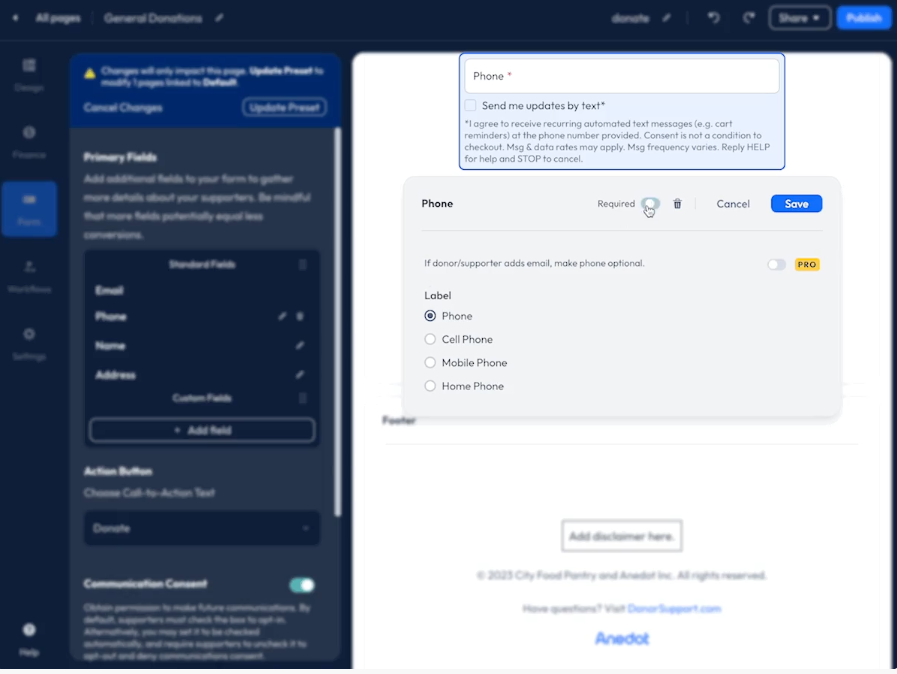
The Phone field can be added as an Optional or Required field. To set it as required, be sure to enable the Required toggle.
Note: The following Phone fields are available when Pro has been enabled for the fundraising account:
- Cell Phone
- Mobile Phone
- Home Phone
When Pro has been enabled on a fundraising account, the option to allow a supporter to enter either their Email or Phone becomes optional. When Pro is not enabled, Email is always required for successful submission.
Name (and Organizations)
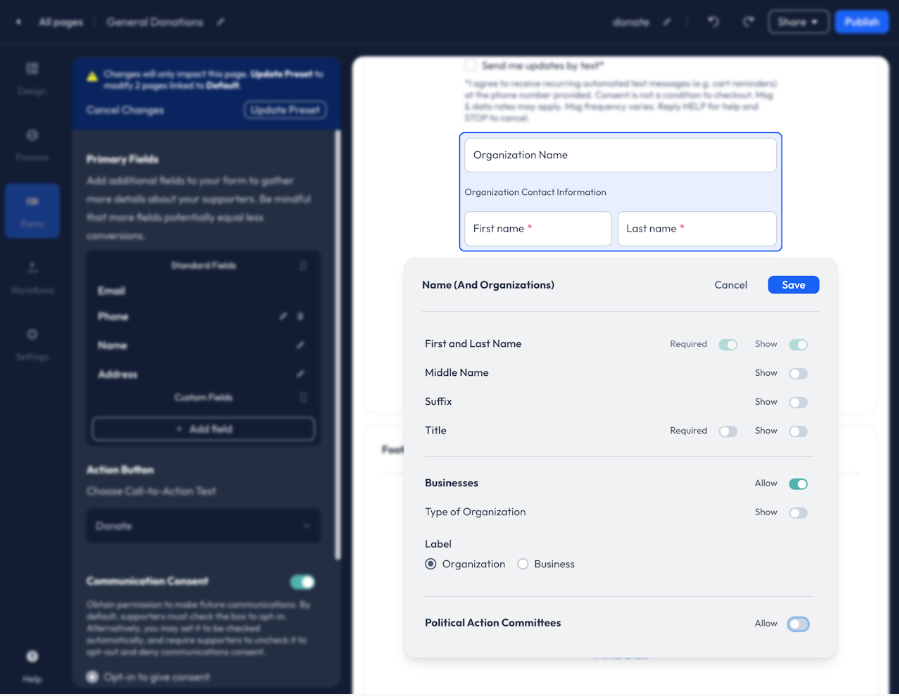
Within the Name field editor, you can enable and customize the following fields:
- First and Last Name (required)
- Middle Name
- Suffix
- Title
- Organization/Business
- Political Action Committees
Address
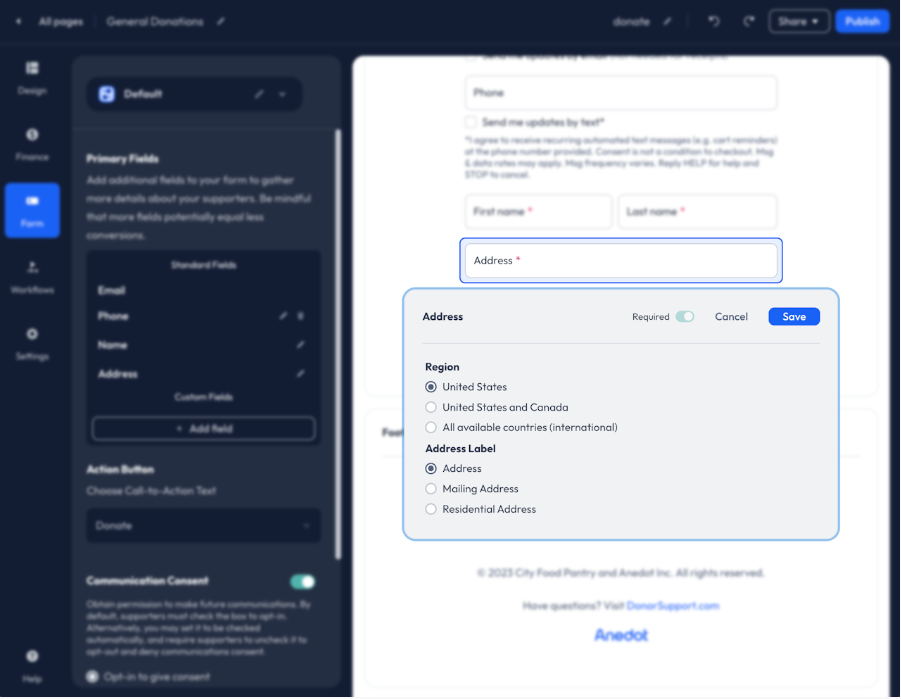
Within the Address field editor, you can enable International donations and adjust the Address Label.
The following Address Labels are available:
- Mailing Address
- Residential Address
Employment

Collect Employment data by enabling Occupation, Employer Name, and Employer Address.
Disclaimer: Be sure to enable the Required toggle for Occupation, Employer Name, and Employer Address to prevent a successful submission with incomplete responses.
Adjust the Occupation field by selecting the Occupation Field Label: Occupation or Principal Occupation.
Once you have selected your Occupation field label, you can apply Help text (optional). This allows you to add additional details for the Occupation requirement.
When applying Help text, if both Occupation and Employer fields are added, the Help text will show as a single text box beneath both fields.
If you need to supply a set list of available Occupations that supporters will need to choose from, enable the Show list of occupations when employed toggle. Once enabled, you can enter each available Occupation type in the Enter occupation... field that populates below the feature toggle. Once you have added your first Occupation type to the list, an additional field will become available.
When applying the Employment field, you can set each field as optional or required. Optional is the default selection.
When Occupation and/or Employer Name are enabled, the following question is automatically added to the page, "Are you currently employed?" Donors can select Yes or No.
If No is selected, the following options will be available in a dropdown menu:
- Unemployed
- Homemaker
- Retired
- Student
When collecting the Employer Address, ensure that you select the correct Region and Type for your organization's compliance requirements. View the available options below:
Region:
- United States
- United States and Canada
- All available countries (international)
Type:
- Full Address
- City and State
- Postal Code (ZIP)
Once you have customized the Employment field data, click Save within the Employment field editor.
Selection List
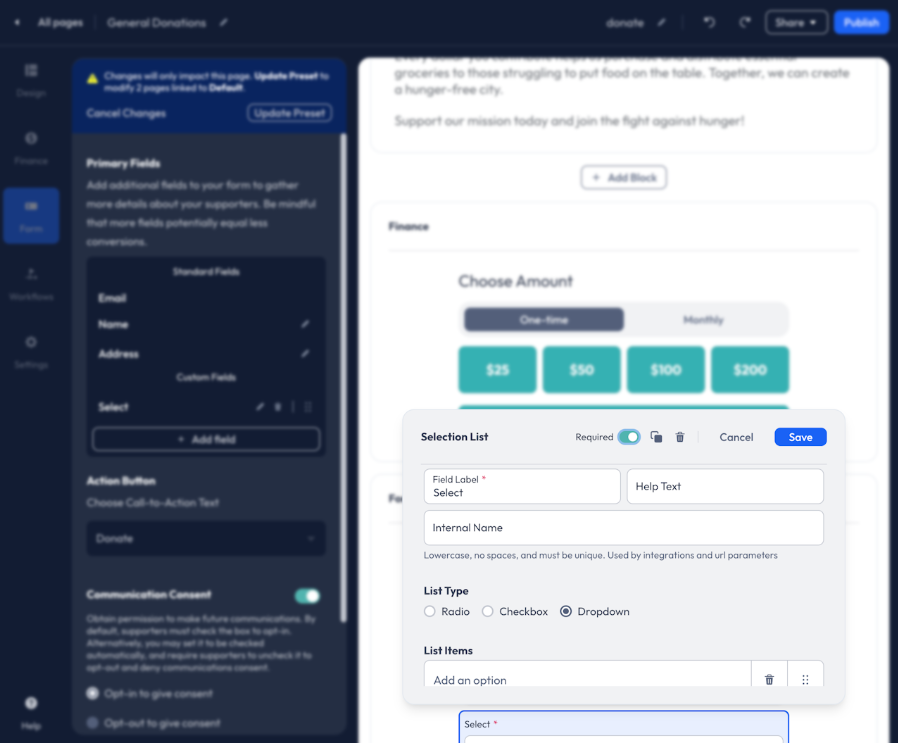
With the Selection List field, add custom questions to your form with preset responses using Radio, Checkbox, or Dropdown as the list type.
Radio will display the response options in a bubble format and allow for a single selection.
Checkbox will display the response options in a checkbox format and will allow multiple selections.
Dropdown will display the response options in a dropdown list, only allowing a single selection.
Hidden
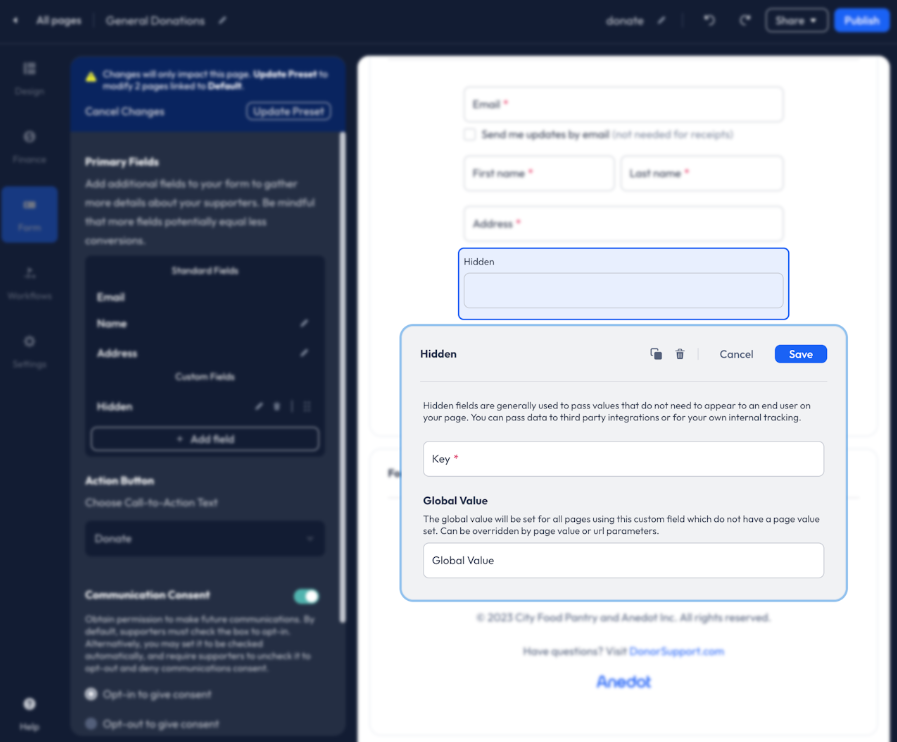
Hidden Fields can be used to pass values that a supporter would not need to see on the donation page. These fields can pass data to your third-party integrations or for internal tracking purposes.
When creating a Hidden Field, be sure to apply a custom Key.
If you have previously set up a Hidden Field with the Key you would like to utilize, access the Account Fields from the Custom Field list to easily connect the Hidden Field.
You will receive an error if you attempt to set up a duplicate Hidden Field with the same Key.
The Global Value will be set for all pages using this custom field. If you would like to use the Hidden Field to apply unique Page Values, leave the Global Values field blank.
Note: A Page Value or URL Parameter can override the Global Value.
To apply a Page Value, access the Settings-Sharing-Page Specific Values tab within the Builder.
Question
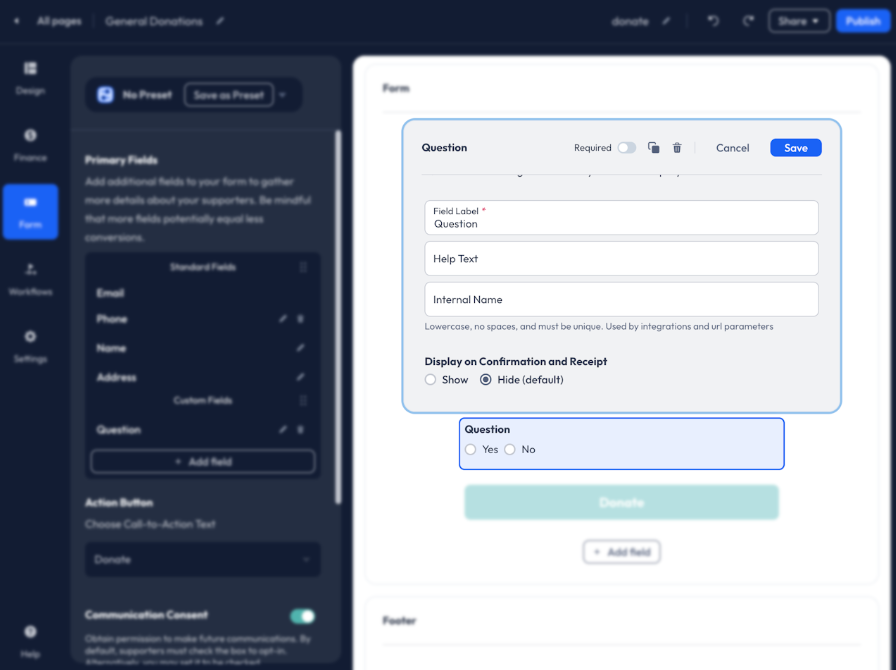
The Question field allows you to ask your supporters a question and receive a Yes or No response.
Within the CSV Export, Yes or No responses will be recorded as True or False.
Text
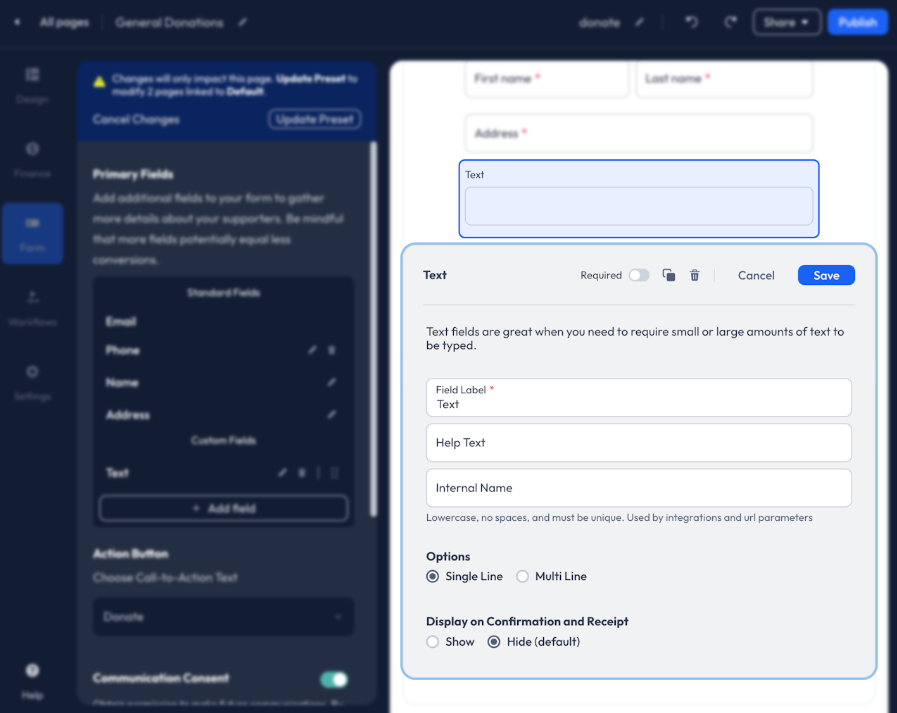
The Text fields allows supporters to enter a custom response that is unique to them.
Requirement
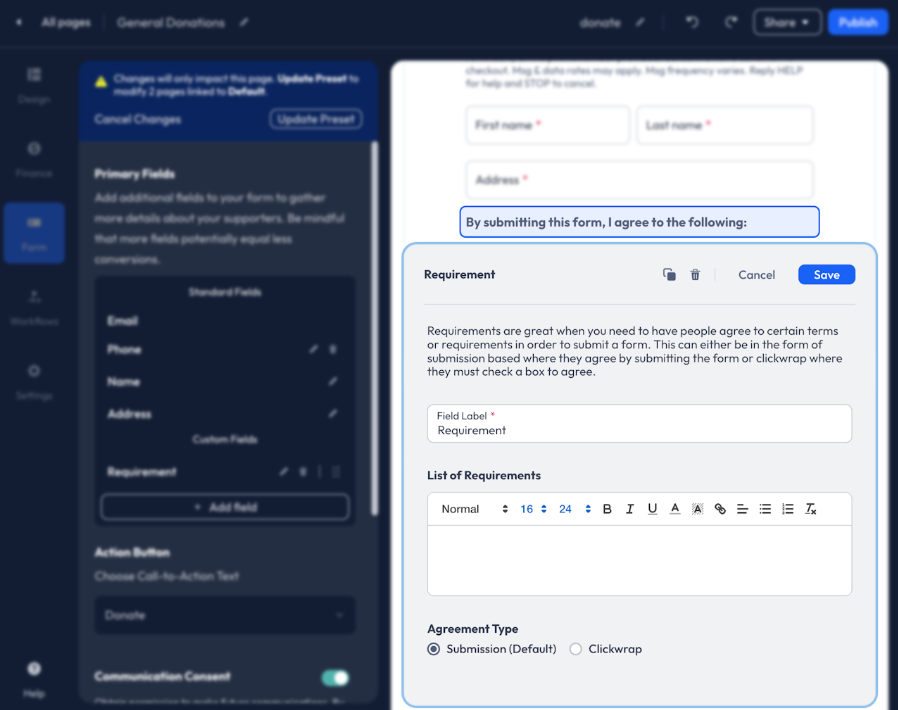
The Requirement field may be used for Legal Terms or consent from your supports. 'By submitting this form, I agree to the following:' will be titled above your Field Label and List of Requirements.
To add a checkbox to the field, select Clickwrap as the Agreement Type.
If you are having trouble editing the text for the Requirement field, you may need to expand your browser window or zoom out within the browser.
Account Fields
Every custom field added to your Action Pages is saved as an Account Field. These fields can be used again for future pages, preventing the need to create the custom field again.
To access Account Fields, click the + Add Field within the Form tab of the Builder, then scroll down to past the custom field types.
You will receive an error message if you attempt to create a duplicate custom field that is already available in your list of Account Fields.
If you'd like to continue creating a duplicate custom field, you will need to alter the Internal Name for the field.
Communication Consent
Enable Communication Consent to obtain permission to make future communications with your supporters.
By default, supporters must check the box to opt-in.
Alternatively, you may set it to be checked automatically, and require supporters to uncheck it to opt-out and deny communications consent.
Allowing your supporters to opt-in to receive communications from your organization builds trust with your donors.
When enabling Communication Consent fields, you are required to add a Disclaimer to the Footer of each page. The Disclaimer should be unique to your organization and include the following:
- Brand Name
- Type of messages sent
- Frequency
- Hyperlinks to your Terms and Privacy Policy
Example Disclaimer:
By opting-in to receive communications from [Brand Name], I agree to receive recurring automated text messages at the phone number provided and I agree to the Terms and Privacy Policy. Consent is not a condition to checkout. Msg & data rates may apply. Msg frequency varies. Reply HELP for help and STOP to cancel.
To add a Disclaimer for the Communications Consent feature, check out the following guide for further instructions!
Ordering Fields
You may adjust the order of your fields within the Form tab editor for Donation and Lead Pages.
For Donation Pages, only custom fields can be re-ordered. Standard fields are stagnant and cannot be adjusted.
For Lead Pages, all fields are adjustable, including the Email, Name, Phone, Address, and Employment fields.
To adjust the order of your fields, click the Reorder icon to the right of the individual field. If the Reorder icon is unavailable, the field cannot be re-ordered.
Once you have selected the Reorder icon, you can maneuver the field above or below your other fields.
To save your changes, be sure to click Publish!